Action Plan/Personal Tracker
Week 1
Session Activities
Initial Research.
Choose an asset for the project.
Make some sketches of my guitar.
Research Some Other Artists
Update Blog
Practice drawing different parts of my guitar.
Go to London to look at assets from the Tate Britain and
the Natural History Museum.
Week 2
Project Proposal
Finish my Close up sketches
Take a Photo for my details perspective drawing
Make some concept art for Promotional art
Update blog
Start Researching into Modelling , Texturing and Uving a Guitar
Maya Experiments
Update Blog
I will look at some videos of modelling and uving,
I will watch videos on drawing the perspective of objects.
Update Blog
Week 3
Session Activities
Start developing my promotional art Initial Sketch.
I should start blocking out my model on Maya.
Update Blog.
Practice my painting skill in Adobe Photoshop.
Start doing some form drawing of my guitar.
Update Blog.
I will watch some videos on photoshop painting.
I will find a videos for modelling guitars.
Week 4
Start developing the base model further
Make a Start on my promotional art
Update blog
Continue developing my photoshop painting skills
Do some experimenting with UV's
I will look into some UVing tutorials on youtube.
Week 5
continue developing model
continue developing promotional art
update blog
initial research
Practice photoshop painting
Do light and shadow experiments
Week 6
Work on my model.
Work on promotional art.
Research.
Update blog.
Week 7
(Easter Holidays Week 1)
Self Study
Continue developing my promtional art
update blog
Do research
look up videos on Uving
Week 8
(Easter Holidays Week 2)
Session Activities
Self Study
Develop promotional art
update blog
do research
Look up videos on texturing
Week 9
Continue developing model
Continue work on promotional art
Research
Week 10
Finish off modelling stage of project
Continue to develop promotional art
Research
Week 11
Uving
Continue to develop promotional art
Research
Week 12
Texturing
Add finishing touches to promotional art
Week 13
Evaluation
Update blog
My Fmp
For this final major project I have to do an asset for a video game. Although you have to do an asset, it's still an asset of my choice. At the end of the project I will need to hand in a fully textured and UVed model as well as a promotional concept piece of the chosen asset. In this project I really want to focus on improving my modelling and UVing Skills. I would also like to improve my drawing and my photoshop painting.
Making a Toy Robot: Promotional Art and Modelling
I want to make a mini robot with simple but cool looking design. First I need to make a moodboard on different types of little robots to plan out my idea. This was my first Idea before I got the brief, I changed it because I thought it stretched the boundaries of the Fmp a bit too much.

Considering Ideas
I want to consider a range of different objects to model, so I have constructed a mood board of possible objects I could use in my asset project. I realise some of these may be too violent to do for my final major project, but this is just a planning stage so none of this is finale.

Potential Assets I Could use in my Fmp
Before I finalize what asset I'm going to do, I first needed to take pictures of objects I could use in my final major project. I took several pictures of different objects that I found interesting, I will have to pick which asset I want to use in my FMP.
These are the objects I found:
Sega Megadrive

Sega Master System Controller

A Chain with a Hook

Chain with a Hook Mindmap

A Sewing Machine

Sewing Machine Mindmap

Oil Lantern

Oil Lantern Mindmap

Ibanez Guitar

Guitar Mindmap

Experimental Initial Sketches
I sketched different objects in a life drawing session. On the first session we did a sketch where we took an asset we liked, then we drew it from several different angles. In the second session we just sketched multiple different assets. We did this to improve our abilities preparation for when we choose our actual asset.
These are my experimental sketches..
This is the experiment where I drew one asset from multiple different angles.


This is the experiment where we drew a multitude of different objects.


Trip to Tate Britain and National History Museum in London: Research for FMP
When I was in the Tate Britain I found a piece of art that I could possibly implement into my promotional concept art. It's called La Mitrailleuse and it was painted in 1915 by Christopher Richard Wynne Nevinson during the First World war.

In the Natural History Museum I found a lot of potential textures to put on my asset, first I found a sequoia tree trunk which was perfect for making a tattered and old texture for my guitar asset to make it look visually interesting, then I found some minerals that I could use on my asset to make it look really interesting.
Sequoia Tree Texture
I took a close up image of the sequoia tree texture, I think this would work really well as a texture for asset the colour is nice, it's got little scratches in it to show wear and tear and It would work really well with almost anything I try to do with my asset.

Minerals
Here the pictures I took of the minerals, I could use this to add some extra detail on to my asset to give it that extra wow factor.


Oil Lantern
I really like oil lanterns they have such an interesting look to them. They work particularly well in horror game, probably because they always seem to pop up in scenes that ooze creepy and supernatural.
A mood board to explore different designs for oil lanterns. I'm going to use these to come up with a custom design for a lantern.

Oil Lanterns in Games:
Amnesia: The Dark Descent
This is a horror game that features an oil lantern. This lantern is use to traverse your way through the dark areas of the house, I could use something like this in my backstory for the lantern. I choose this game because it's a feature of the gameplay rather than just an asset.

Backstory
Idea 1:The oil lantern was left behind on a greenhouse table to go out, because the owner went out to check for a noise and they never came back. This would be the opening to a horror game, you would have to use the lantern to find your friend who's disappeared into an alleyway
Idea 2: Down in the depths of a long forgotten cave lies a lantern, this lantern is said to have been able to capture the souls of people. Some say is you look close you can see the captured souls within it's glass interior.
This could be an artifact in an open world/fantasy game. Say you need a certain artefact to get into a certain dungeon, then you go into the cave it's located and pick it up, finally go back to the dungeon to unlock it.
Idea 3: The lantern is broken on the floor with blood on it. Some say that some complete moron who was drunk smashed there head on it just for a bet. Of course what I mean by some say is that pretty much everyone says it because it happened in the middle of the town.
This could be an object that you smack people with in a fighting game, this fighting game would take place in a pub and you'll be fighting off armies of drunk people. Honestly this idea is not likely to happen considering it's way too violent, but it is an idea I had so I might as well say what it is.
Modelling
I would probably have the oil lantern on a table, maybe a dim light could could be shining from the lantern. I don't think I would enjoy modelling a lantern that much, I can make some interesting backstories but modelling this seems like it would become a chore before long; this is because modelling a lantern seems quite restrictive and doesn't leave much room for interesting designs.
Initial Sketches
Some oil lantern sketches to try and learn about the form and the proportions of these lanterns.

Gauntlet
You can do a lot with the design and backstory behind gauntlets, in fact out of all the object here this is probably the one I could do the most with. There are so many different genres you can put them in comedy, action, fantasy even horror. Also it would assist me in developing my hand drawing because at the moment they aren't that good.
Here is a mood board of different gauntlets. I will use these as a template to formulate my own design for a gauntlet.

Gauntlets in Games:
Skyrim
These are the dwarven gauntlets from the game Skyrim. I really like the design of these of these gauntlets probably because they don't have that over the top fantasy look, but they still manage to look like their from a fantasy setting just with a more realistic and down to earth style.

Backstory Ideas
Idea 1: Everyone loves the power gauntlet it's so bad, allowing you to play any video game with maximum inefficiency. Simply moving forward in a side scroller has never been more tedious and difficult. Instead of simply pressing forward like those puny casual gamer's, you can enjoy moving your finger sideways for 5 minutes straight just to get your character to move a single inch. The power gauntlet it's so bad.
Idea 2: The Heredan gauntlet was forged by thousands of different gods over thousands of years, they created the most powerful artifact in the entire universe. Then it was meant to be delivered to the wisest being in the universe. However a guy saw Zeus while he was delivering the extremely deadly and powerful artifact, and basically this guy sucked up to Zeus saying he was great and that
he has always been his favorite god, well Zeus being Zeus predictably gave into these compliments and gave him the artifact that could destroy the universe.
Modelling
This will be very hard to model for me because I've never done Organic modelling before. I'm also pretty bad when it comes to drawing hands and modelling could be quite a bit harder, then again it might turn out to be easier than I currently think but I doubt it.
Initial Sketches
Here some sketches I did for the gauntlets. I think I could come up with some cool designs for gauntlets, the thing I would see myself having the most trouble with is the modelling.
Sega Megadrive/Genesis
Out of all the assets I have chosen this is probably the one I'm least enthusiastic to explore further. While it may have the potential to turn out to be something nice, I just don't think I would find it very interesting to model or draw. This is because all I would really be doing is making a box. While it is a box with extra details and feature that make unique, at the end of the day all you have to work from is a square and that's just not interesting to me.
Here is a mood board of all the different types of the Sega megadrive/Genesis. I'm going to use these to come up with a design for a sega megadrive like console.

3D model:
Sega Megadrive/Genesis
I couldn't find a game with the Sega Megadrive/Genesis in so I found a 3D model of one. This is just to representation what it would look like if it was in a video game, this person has used the Sega Megadrive/Genesis 2 as a reference for the model.

Backstory Ideas
Idea 1:A woman found their old Sega megadrive in her attic while doing some cleaning in her house, with further investigation she also found some games to go along with it. The console worked fine but the games didn't work. She went on ebay and found someone selling one of the games she wanted for a decent price, since it was a click and collect she went to the seller's house the following day. When she arrived she rings the doorbell and the floor mat actually turns out to be a trap door. She ends up falling into an underground fighting ring, she'll need to rip and tear through every single other person before she can claim her prize (The Sega Megadrive games).
Idea 2:
Modelling
Like I said in the introduction to this up above I really don't think I would be interesting in modelling a square. While you can definitely make something like this look nice. I don't think I could spend the rest of the project modelling something like this, it would get dull after a while and I would start to lose interest.
Initial Sketches
experimental sketches of the sega megadrive.

Rolls Royce
These are easily my favourite type of car, all of them have nice designs and colours (apart from the white and gold one that one looks awful). You can't really relegate these cars to one genre because they can work in a variety of different genres. Here are three genres I could put them in: horror, crime and action
A mood board of all the different typed of Rolls Royce. I will use this to create a design for a rolls royce type car.

Rolls Royce In Games:
Sleeping Dogs
Using a Rolls Royce for Fmp is going to be quite hard, considering I can't actually use the name Rolls Royce because it's obviously copyrighted. Games like sleeping dogs actually remove the logo entirely so it's not copyrighting the Rolls Royce name, but it keeps the base design and colour of the Rolls Royce.

Backstory Ideas
Idea 1: A detective has a sentient car that has extraordinary abilities, this is because the car is possessed by an entity from another planet. The detective and his car are investigating a crime scene, a jewellery store that has been ransacked by a famous criminal organisation.
Idea 2: Every time someone dies in our village a black and white car is seen by the graveyard, then the following morning the person who died vanishes. Some people seem to think that the car actually belongs to the grim reaper, these theories came about because some kids where out one night, and saw a guy put the body into the car boot. This man is said to be over seven foot, very skinny and has a face so pale it's almost blinding white.
Modelling
Now I love the idea of making a car inspired by the Rolls Royce as a 3D model, but I honestly think I would have lots of trouble with it. I don't know how well I would take working on a car for the rest of the project, the prospect of it seems great but I think I would quickly get tired of it during the actual modelling process.
Initial Sketches
Here are a few initial sketches of the Roll Royces. If I picked this as my asset it could really help me improve my car drawing, because at the moment they are all off.

Guitar
A guitar opens up tons of possibilities for backstories and design. Guitars can fit in almost any genre from Horror to Comedy, you can always find a way to add in a guitar of some description. For genre I would probably choose a Crime/Mystery game.
This is a mood board of different guitar designs. With these designs I hope to formulate my own interesting guitar design.

Guitars in Games:
Guitar Hero 3: Legends of Rock

Backstory Ideas
Idea 1: A guitar player called Gordan is found dead in his apartment by one of his neighbours. He apparently used to be terrible at playing the guitar, but seemingly over night he suddenly became a guitar playing prodigy. Some people have claimed he signed a contract with a celestial being, his family and friends say that's an absolutely ridiculous statement.
Idea 2: Some say the Guitar belonged to a legendary warrior who fought the forces of evil. The better you were at playing the guitar the stronger it's effects were, the guitar emits shock waves of powerful energy that blow away any person that dare stand against it's might. However know it's just a broken shell of it's former self having been destroyed after the warrior went completely insane, turning against their kingdom and friends to fight for their own selfish desire.
Modelling
I think a guitar would be quite an interesting thing to do, the basic shape of the guitar wouldn't be to hard to make, probably the most challenging bit of modelling the guitar would be the Uving. However I do think that both the detailing and texturing would provide a very moderate challenge as well.
Initial Sketches
Here are some sketches I did of the guitars. Now I've sketched them I have found there are a lot of interesting designs I could chose from when it comes guitars.

Developing Two Assets
I picked two out of my five initial Ideas to develop and see how they get on, the one I like the most will go on to be the asset for my Fmp. The assets that I think have the most potential for development are the Gauntlet and the Guitar. I picked these two assets because I'm confident I could do them in the time frame I have been given, they have a back story that has the potential to be interesting and they're are quite a few different interesting designs I could do for each asset.
Gauntlet (Further Development)
I will delve deeper into how to draw a gauntlet, find more types of video games you can find gauntlets in and estimate the time It will take to fully model, uv and texture one.
To start off my research my extended research on the gauntlet, I found someone who made a gauntlet from the game Dragon age 2. I thought I would use this as a reference to make some concept art for my gauntlet.
Here is the artist's site: https://tatjna.com/tutorials/knight-captain-cullen-dragon-age-2/gauntlets/

Down below I have done a developed sketch for a gauntlet of my own design. For step one I copied the form of the gauntlet from the reference image, then In steps one and two I proceeded to develop my own custom design for the gauntlet, finally in step 4 I started to paint it out to get an idea of how it would look in colour.
Step One

Step Two

Step Three

Step Four

Guitar (Further Development)
For my second object I have chosen I have chosen a guitar. I will find out an interesting perspective to draw a guitar from and estimate the time it will take to model, uv and texture.
I decided to start off with I didn't want to go with any fancy perspectives, for now I just want to get a solid design for the guitar, then I can focus on looking at dynamic perspectives.
The image that I took is from this site: http://theguitaraddict.blogspot.co.uk/2011_02_01_archive.html

I have done a developed sketch of the guitar and I have even attempted to color it. For this object I used the same strategy as I did for the gauntlet I copied the reference image and altered the design slightly, then afterwards I painted it to get an idea about how the finale design will look,
Step 1

Step 2

My Chosen Object
I was stuck on what asset I wanted to use because I had so many different options to choose from. Eventually I settled on my guitar. This is because I own it so I have constant access to it, meaning I can take as many picture as I need to. Also it's just a really appealing asset that should provide a fair challenge to model and draw, but it doesn't stray too far out of my skill range. I think the shape of the guitar looks like something that came from the 1950's, this sparked my inspiration for the crime/mystery theme that it centred around my model and promotional artwork.Reference Images
I will use these images to get a better idea of the different components for a

Software and Materials I will use in my Fmp
In this project I will be using lots of different programs and materials. I will list off all the ones I know I will definitely use in this project. If I use any other software/Materials than these one later on in the Fmp, then I will mention them further down in the blog.
Pencil and Paper
The first resource I will be using is a pencil and paper. I will need to constantly use this throughout my Fmp for any sketches and traditional drawing. which is a big part of this project so I will need to keep these handy.
Maya
This is how I will model, Uv and Texture my asset, this is pretty much like my pencil and paper for 3d modelling. There are other 3d modelling software I could use but this is the one I know best. I am trying to challenge myself with the asset I chose, but I don't want to over do it because that didn't go well in my Environment modelling project. This time I want to finish my model and make it the best it can possibly be.

Photoshop and Wacom Tablet
I will use these two resources for all my concept art and my final piece of promotional art. I will also need these tools to make the normal maps and textures when I get to the UVing stage on the 3D part of the of this project.

Project Proposal
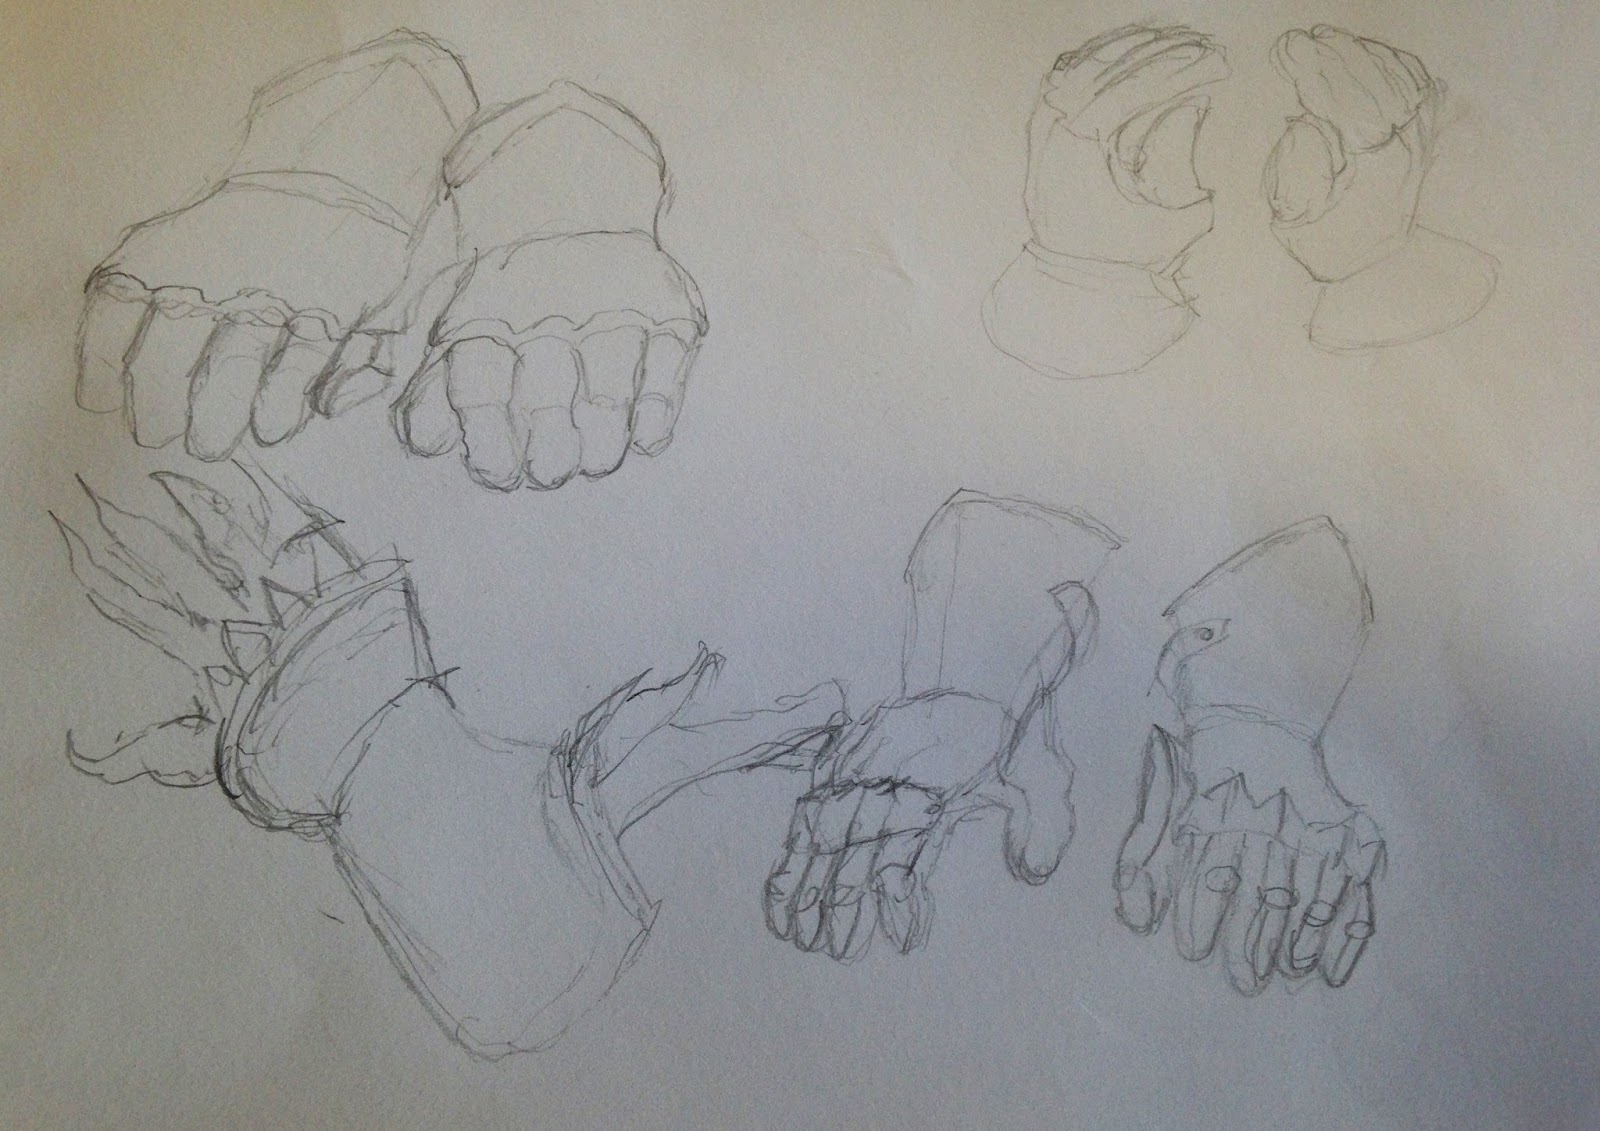
Breaking Down My Asset In Smaller Assets
Before I start sketching the whole guitar I should mainly focus on the smaller assets. This will help me with the finer details of my asset, because if I just drew the whole thing straight away than I would definitely miss all the finer details.
I took close up pictures of all the different smaller parts that make up the object, I will use these as references images for my 3D model. These are references for the close up shots of my guitar.

Here are some sketches of the different components that make up my asset, I did this to get a better grasp of the finale details on my object.


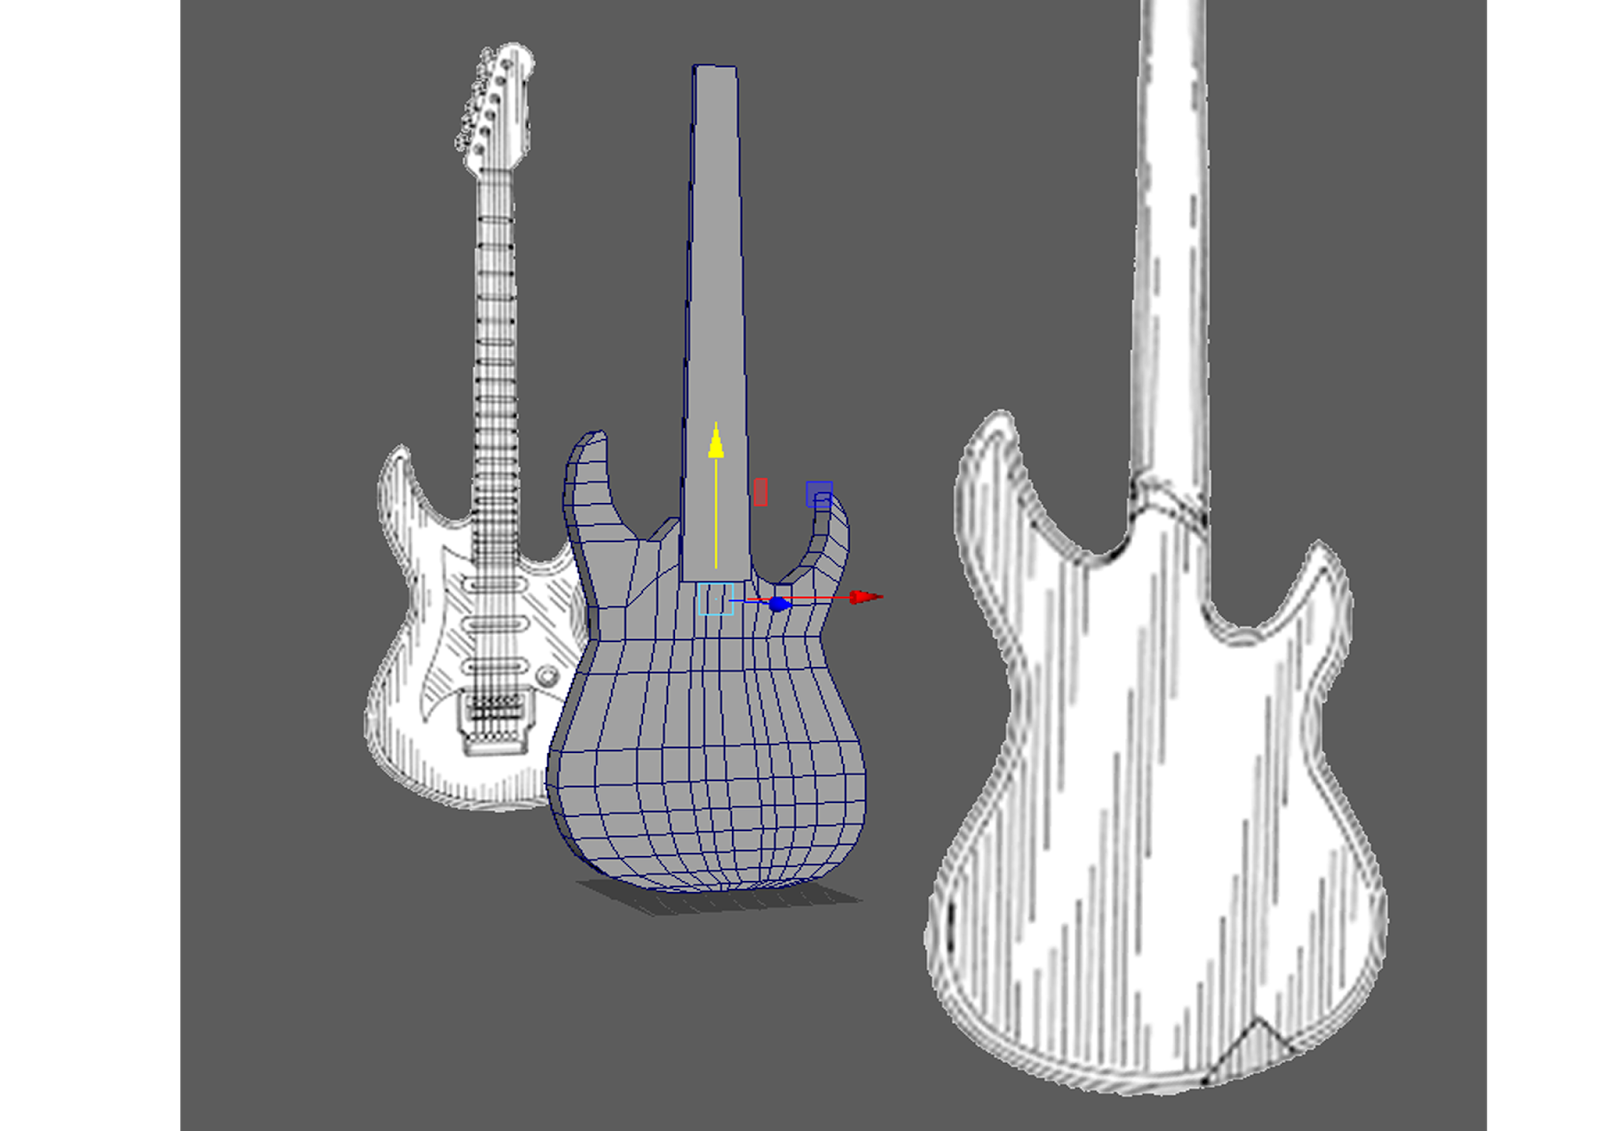
Guitar Modelling Experiment
Using Maya I attempted to model my guitar from reference images, to see how long it would take and make my finale decision on the asset I wanted to model. If I found that the asset I chose was too simple or too difficult, than I could change it or adjust it to make it easier or harder on are myself depending on how difficult or easy it is.I pretty confident that I can get this done within the time frame I have for this project. It's true I didn't finish the model. but I gained valuable insight what I would have to do to make this a high quality project. The main difficulty I ran into while trying to model the guitar was the back of it, trying to model the back half of the guitar was quite a challenge, this is because the back of the guitar is rounded and 3D modelling rounded object is something I find really hard.
I have an Image of my model from my practice session, also I have some videos of me going through my process while I model the guitar.

Guitar Concept Art Experiment
This was an experiment to see what I could do with my promotional art. I think that this perspective is quite uninteresting and doesn't really ooze creativity, also the colours are really bland and I think in later versions of this concept I will switch up the colour palette.

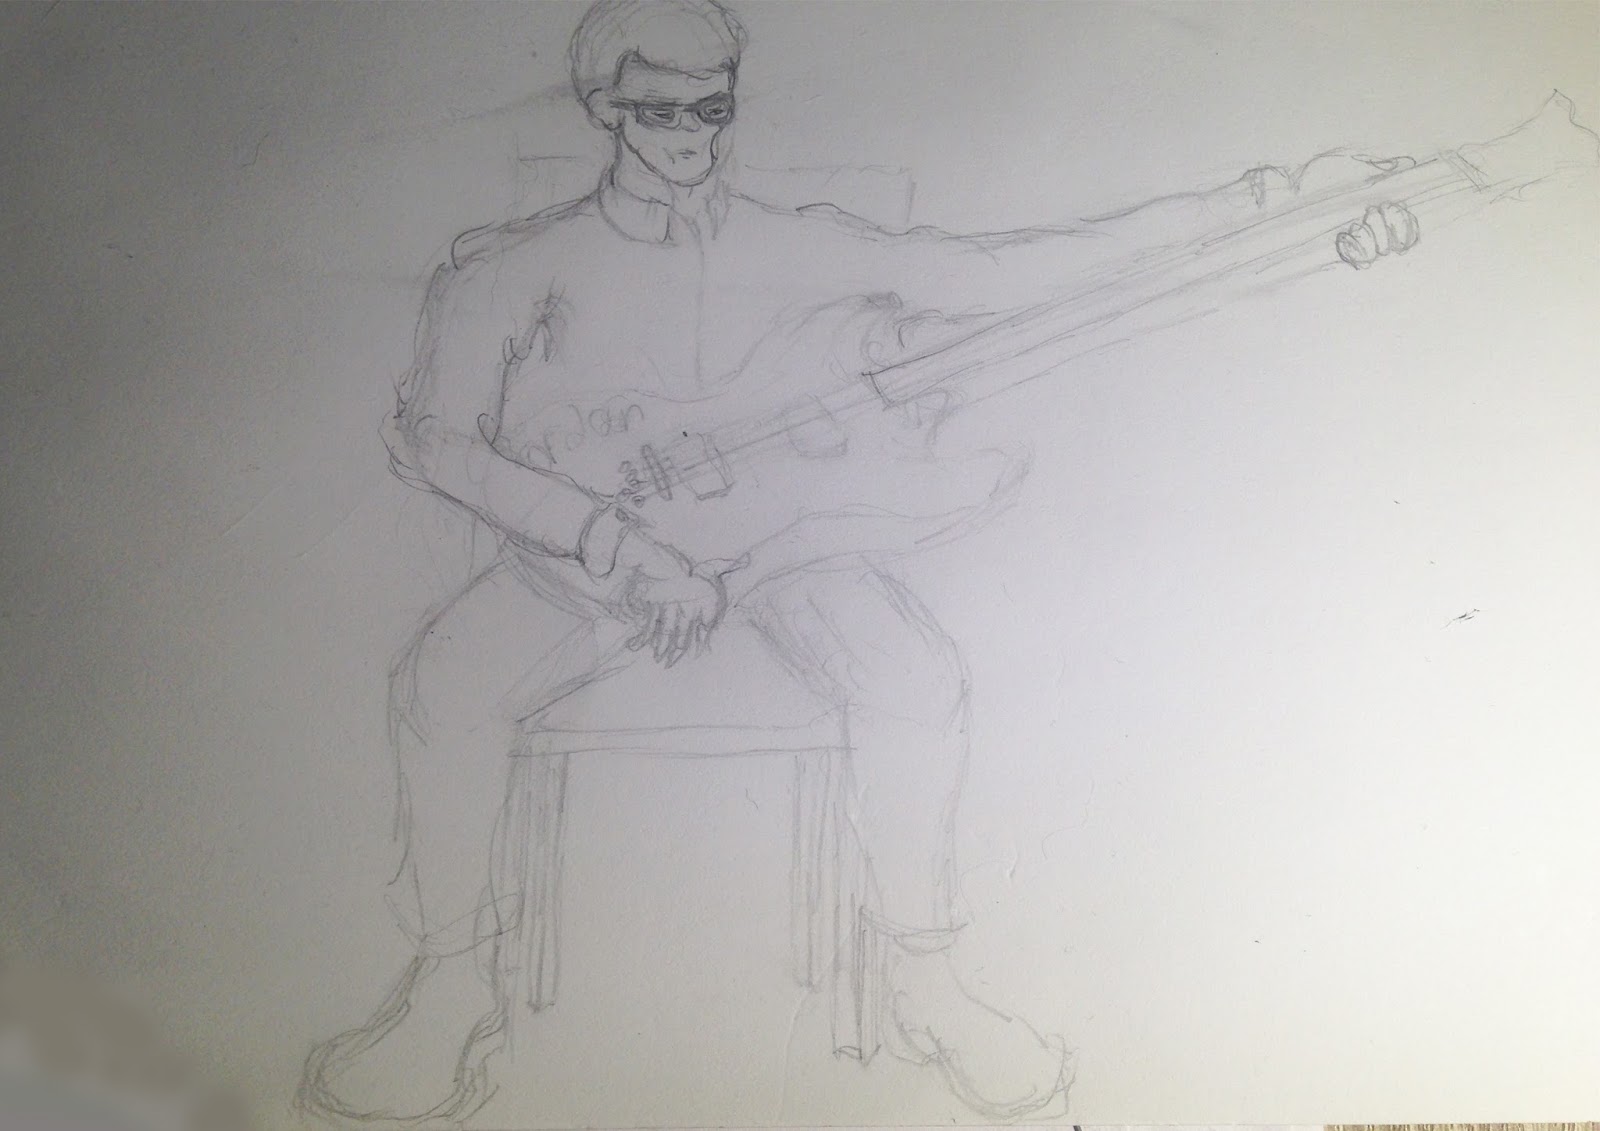
My First Initial Sketch (for Promotional Art)
I made quick sketch of what my final promotional art will look like. There are mistakes like the arm holding the end of the guitar being way two long and his feet being absolutely enormous. This is the supposed to be the scene just before he dies so I want to make him looked drained and almost lifeless. I will improve this as I go along in the project because this is just a first draft.
Other Artists Who Have Painted Guitars
I want to research other artists who have painted guitars, this is so I can try to get some inspiration for my promotional art. Also I can see if there are some interesting angles I can use in my art.
By Fabian Perez

The artist choose this object because they were inspired by the different colours and shadows on the object, this person thought that it would look very pleasing to the eye as a painting. I think it really inspires me to consider the position and angle of my guitar when I come to my promotional art. The shading in the room around the guitar gives off a mysterious aura since my concept is focused around a crime scene, this will really help me to consider the tone of my art when I start my lighting plan. I really wouldn't want to change much about the picture, but I would define the shadows more to give it more of a mysterious feeling.
By Bruce Langton

The artist chose this object because he has an interest in music, he also has done multiple paintings of guitars before this so he probably specifically likes painting guitars. I think what Inspired me was how the guitar is coloured, it's really simplistic but it'still very effective and makes the painting stand out. I don't really know if I would do anything differently here it's a very solid piece of art, I would probably make the shadows stronger and add more texture to the guitar.
Week 3 Wednesday 15th March targets
Research artists relevant to my project.
Do an artist Interpretation of the artists work.
Make a start on my model
Lighting and Shadow in Art
My first project on this course was on German Expressionism, I want to refer back to it because I did lots of work on lighting and shadow and I know that the techniques I learned back then will be of great help to me in this project.
Tahirih Goffic

I like this style because there's a lot of expression in it and there's a good mixture of saturated and muted colours. They used different shades of brown, red, yellow, orange and white; They used oil on canvas to make the painting. The brush strokes aren't really brush strokes at all, the artist actually used a pallet knife to create the stokes in the painting.
My Interpretation

I learnt quite a bit about what colours go well with each other and how to combine all the different shades and colour types to make a very life like painting. My interpretation doesn't quite match the skill of the artist I interpreted, however I do think I did a pretty decent job of emulating the style of her work.
Reference Image to put into Maya
I took pictures of the front and the back of my guitar, these pictures are to put into Maya. The reason I did this is so I could make the body of the guitar accurate in size and proportion; This saves a lot of time, so I can focus less on the right proportion and size of the guitar and spend more time on the finer details.
Unfortunately I don't think I can use these images because there's not enough focus on the guitar, also they're just not clear enough to make out the finer details.


I will need to crop these images in photoshop, this so I have less focus on the space around the guitar and more focus on the guitar itself.
Starting to Make My Model
I decided that week 3 would be the best week to make a start on my model, so I could finish the base quicker and have more time to detail, UV and texture it. I learned a new technique for developing the base of my model.
First of all I got I new reference image because I know my camera simply cannot take a clear enough photo of my guitar, I also found out that it's better to do the guitar in parts instead of making it one whole mesh, this is because in real life a guitar tends to be made in separate pieces and then put together afterwards.

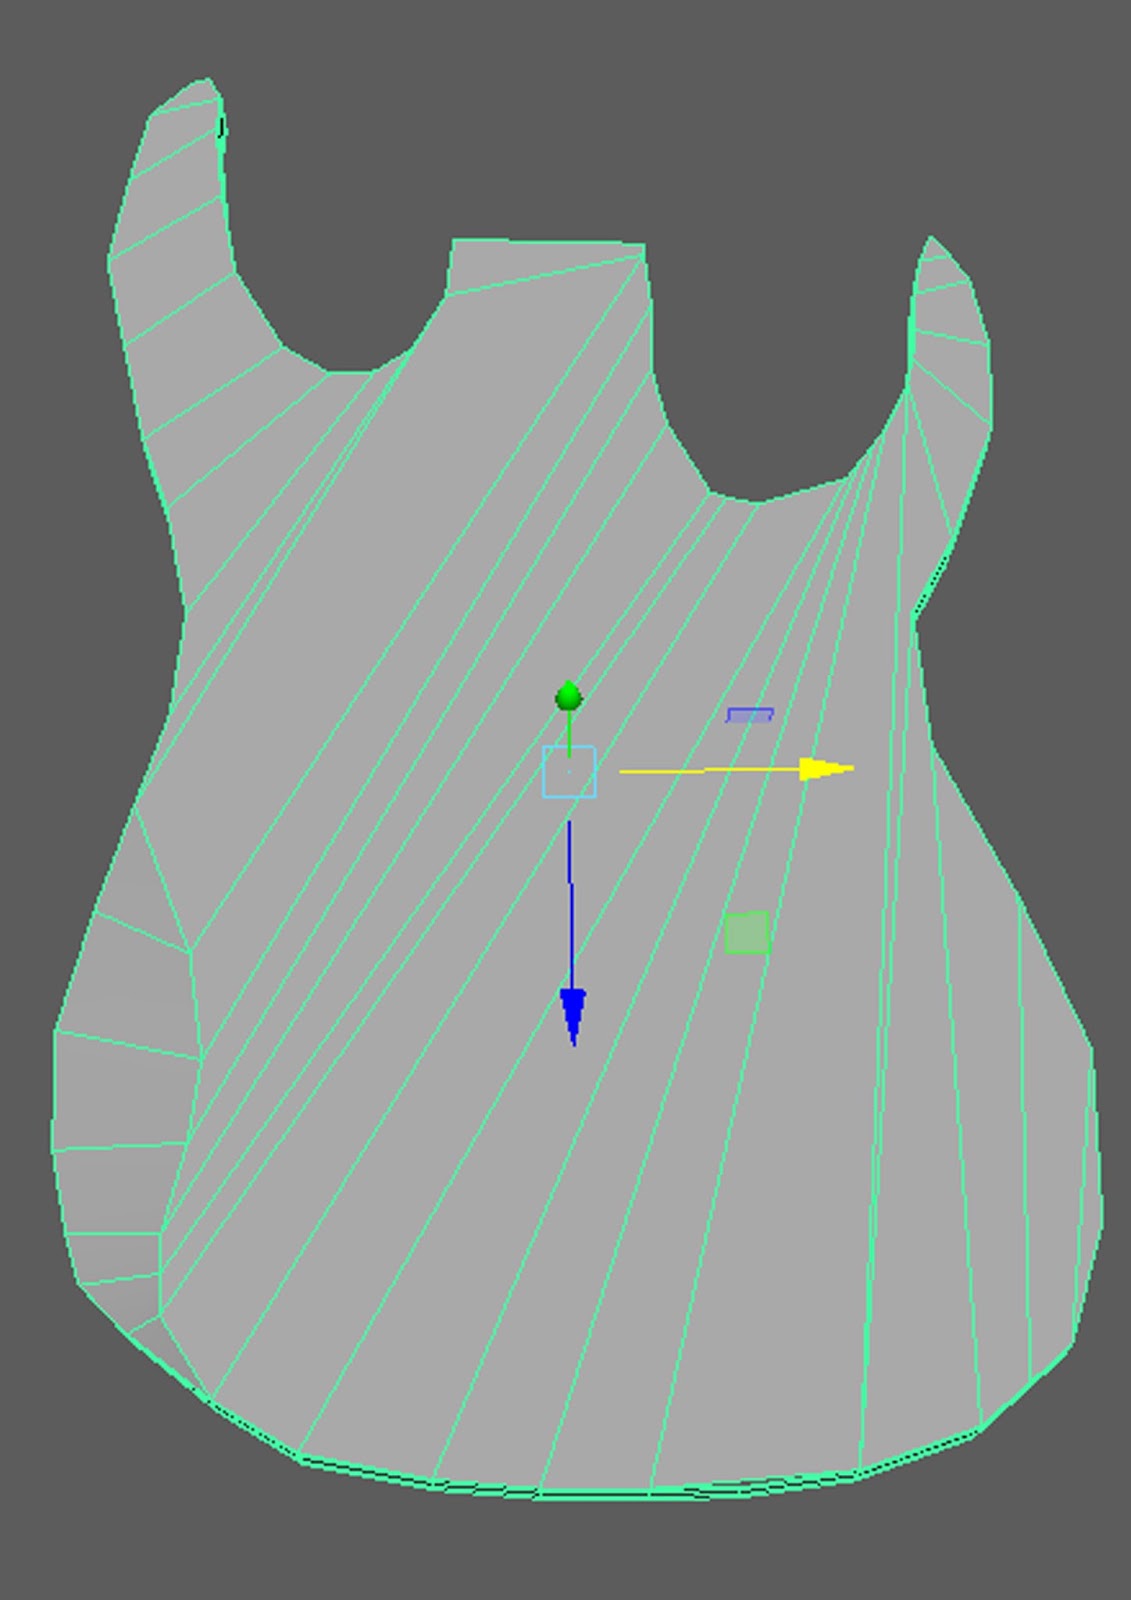
This is the polygon creation tool this allowed me to create the guitar base with correct geometry, all I did was select the tool then trace around the lines of the guitar base to make the polygon.

This is the polygon base I made by using the polygon creation tool, as you can see the end result is the polygon looking mirroring the look of the reference image quite well.

Week 3 Wednesday Target
I managed to achieve all I wanted to do today. I researched an artist relevant to my project and did an Interpretation of their work; Also I made a start on my model.
Week 3 Thursday 16th March Targets
Make a Start on my perspective drawing for my guitar.
Research Different Painting techniques.
finish off my artist research on lighting and shadow.
Mood boards of Guitars
Here are a bunch of mood boards I've made to research all different types of guitars. I have made one for guitars in video games. I made one for different guitars in movies and TV shoes. I also made one for different guitars in cartoons.
The reason I'm looking at things other than games is because I want to see how other forms of entertainment handle guitars. Then I can hopefully find an Idea that hasn't been utilized in a game and see how it would work in one.
Guitars In Video Games

I made this moodboard to get an idea about how guitars are utilized within a video game. I didn't
want to be obvious so none of these guitar are from guitar hero. Most of these guitars are actually utilized as weapons in game, however the acoustic guitar is just an asset you find in game.
I definitely want to stray away from the idea of weaponizing the guitar because 4 of the 5 guitars I found are weapons in game. It's safe to say that the guitar being a weapon is quite over utilized within games.
Guitars in Movies and TV shows

I had a hard time finding guitars in Tv shows and movies. Not many of the guitars I saw had interesting designs, so I stuck with the four on the moodboard. I researched into guitars in movies and tv shows to see how they designed the guitars and how they utilized them. All the guitars are just used for playing music and don't really have any other notable abilities.
However what I did gain from this was some of the really cool looking designs for the guitars. From a design standpoint this moodboard will be helpful to me. With all these different interesting designs I could definitely come up with something interesting; when I start the process of designing my guitar.
Guitars In Cartoons

Out of all the guitars I have looked at the ones in cartoons a by far the most interesting. There's a guitars that's used as a rocketboard, a guitar that doubles as an axe and there's also a guitar that shoots laser beams. Yes they can all be played but there is far more nuance in the way they are being used.
The idea I probably find the best however is the idea of the guitar being used as a rocket board. There are so many cool concepts I could come up with a rocket board guitar. Unfortunately however it doesn't fit the backstory I have made for the asset.
Concept Sketches for Guitar
I did a couple of concept sketches for my 3D model and my promotional art. I wanted something that looked a bit mysterious and occult, but not so much so that it seems corny and takes away the aspect of realism from the object. I think I did a good job translating the idea I had into my head onto the paper.


I decided I would just make the guitar instead of the guy holding the guitar. The reason made this decision is because I want to spend more time putting detail in to the asset, after all this is an asset project and making the character the main focus of the promotional art, would stray from the actual point of the project.
Perspective Drawing. Pt 1
I will do a perspective drawing of my guitar, this will further improve my art skills as well as giving me a good idea of how to draw my guitar.
Here is the photo I took of my guitar for this perspective drawing.This image will be use for my perspective drawings.

I first blocked out my drawing to try and get a basic idea of the perspective, so when I get to the actual drawing part it will look similar to the reference photo.

This is a quick experimental sketch of my guitar for the perspective drawing, I did this so I can go back to it with a better understanding of how to accurately show the perspective of the object. As you can see the perspective and angle of the guitar is a bit off, so when you look at it looks more like the guitar has a small neck, rather than the neck actually pointing away from the base of the guitar.

Week 3 Thursday 16th March Targets
I met around at two thirds of of my target for today. I didn't manage to research into different painting methods, however I did finish my artist research and I made a start on my perspective drawing.
Light and Shadow Experiment
I did a lighting and shadow experiment to prepare for my promotional art final piece, this may not be an actual guitar but it will help me greatly when working with light and shadow. Light, shadow and shading in general has always been one of the things I have struggled most on while developing my art, I thought that this project would be the perfect opportunity to remedy that.
This is my process for adding light and shadow to my paintings.


Looking up what materials are used in a guitar and how they're made
Before I model I need to find out what my guitar is made out of and how they are made. When I get around to modelling if I don't know what materials they use or how their constructed, then I won't be able to make a convincing model of a guitar.
Types of woods used to make base guitar:
The base of the guitar is from what I know only made out of wood, however their lots of different types of interesting woods to cover when talking about the wood that is used to carve out the base of the guitar. Also an interesting fact I wasn't aware of, apparently the wood of the guitar actually effects how it will play.
Basswood

Basswood is quite a cheap wood and is really common. Colours of the wood can range from white to light brown. The basswood tree grows in North America.
Alder

Alder wood is a soft wood with a textured look to it. Alder wood has quite the varied colour palette as it can come in colours from pale yellow to reddish brown. The Alder tree also grows in North America.
Padanuk

Padanuk is a very nice looking wood also quite a hard and heavy one. When this wood is freshly cut it's a bright orange red colour. but when it's cut it goes to a dark chocolate or light brown colour. This wood come from the African Padanuk tree which is located in Africa.
Zebrano
Zebrano wood is also called Zebrawood. The wood is either light brown or cream with stripes ranging from dark brown to black. It comes from West Africa. You find this type of wood and a Zebrawood tree.
Types of woods used to make the neck
(note: two different types of wood are used on the neck):
Maple

There are lot of different types of maple, but for my neck I'm going to use the maple that's light brown in color. This is going to be the first type of wood that I will use for the back half of the neck.
Ebony

Ebony is a wood that is a pitch black color that sometimes has yellow and brown streaks. The ebony tree grows in Africa. This is the wood that I will use for the front half of the neck.
East Indian Rosewood

Rosewood is light brown with the slightest hint of purple. This wood come from the East Indian Rosewood tree with grows in Asia.
Material used for Strings:
Nylon Strings
Nylon is a type of plastic. Nylon strings are usually put on acoustic guitars and have a unique sound. Nylon strings are see though and are tied at the end of the guitar.
Steel Strings
Steel is a metal. Steel strings are used on both acoustic and electric guitars. Steel strings tend to have a spiral like texture to them, they're also thicker than nylon strings and have more of a gold/silver like colour to them.
Perspective Drawing. Pt 2
I first made a map of the asset to try and accurately draw the proportions for it. I think with this grid, my drawing will to turn out much better and look much more professional than the first draft I did.

As you can see the end result of my drawing is much better than the previous one, thanks to the map I drew I managed to better capture the perspective of my object. I personally think that this is an okay representation, although I think I could have worked to get the perspective more accurate.

Drawing my Asset from a different Persepective
Here is the other picture I choose to draw from when drawing my guitar from a different perspective. This image is going to be used for the perspective drawing.

I want to do more perspective drawings from different angles. I'm doing this so I can decide which one I would like to use in my promotional art.

This time I drew my guitar from a side view just to see what kind of effect it had. I personally think that the other perspective I did was better and I feel that I could produce something much better from the the first perspective I did.

Tuesday 21st March 2017 Session Targets
At the end of today I want:
Develop my model further.
Look up a video on modelling a guitar
Technical Difficulties
I didn't manage to develop my model further, because I ran into a problem which I will need to remedy.
As you can see the topology shown on the model is very messy, this may not be so big of a problem now but later on in the project this will really stab me in the back.
Solving The Problem
I've decided I would use the method where you model from a single cube, as seen in the video in the link below: https://www.youtube.com/watch?v=HX8M4SKa_Cg&t=111s.
This is a screenshot from the video:

As you can see in the screenshot and the actual video modelling from a cube gets you the same amount of detail, but it's also a lot easier to get clean topology because you making it manually.
I did have a go at the method where I made my own polygon, but unfortunately it just didn't work out for me.
Tuesday 21st March 2017 Session Target Achieved
I ran into a problem so I couldn't really develop my model further. I had to start over again. I managed to find a video which helped me a lot while trying to redo my model. After that though I unfortunately didn't have time to do more research into the materials used to make a guitar.
Wednesday 22nd March 2017 Session Targets
In this session I want to further develop my model, do some research into photo shop painting, do more research into the materials that make up the guitar and do some research into what images to as my references in maya.
Working on my model
I have started to develop my model by using the cube method and so far it's going well. So far I haven't experienced any problems but that's bond to change later on in the process.
This is what I've got so far.

I feel like the this model might take about 6 six hours to finish, however I'll give myself twelve hours just to make sure I can get it done in the allotted time with as much detail as possible.
My overall estimated time for the Guitar is: 12 hours.
Modelling- Around 3-5 weeks
Uving- Around 1-2 Weeks
Texturing- 1 Week
It could take longer depending on how long the the basic shape will take to block out, also how long it will take to add all the finer details.
Painting Experiments on Photoshop
I' m experimenting with methods of painting on my chosen perspective drawing for my promotional art, I want to do this to find out the best way to detail and colour my paintings in photoshop to make my promotional art the best it can be.
This is the first experiment I did. It's okay for a test run however for a final piece on a final major project this is far below average, this doesn't even look remotely professional.

I tried something different this time. I'm first adding in the light and shadow, then I'll start adding in the textures and finally I'll go onto then colour.

I've looked up two videos on photoshop painting.The first is called "Painting Fundamentals" and the second is called "Staging Your Paintings".
Here are the screenshots that represent what techniques I will use from the videos.
From "Painting Fundamentals"

From "Staging Your Paintings"

I continued to develop the painting by blending all the different parts of lighting and shadow together to make it more natural. I'm pretty proud of what I've managed to accomplish so far.

New Reference Images for my model
I have found some references that would be just right for my model. They aren't exactly the same as my base guitar model but they are close. These images will help me figure out the right size and proportions for my asset in Maya.
These orthographic are meant to assist me in getting the proportions of the guitar correct. I found these images that someone did in several separate angles. While they don't accurately represent my design they will help me to get a better Idea of the size and proportion.


Wednesday 22nd March 2017 Session Targets Achieved
I managed to achieve everything I have wanted to today, I researched more into the materials, I looked up videos on photoshop painting, I found some really good references images for my model and finally I developed my model further.
Developing My Concept Art: Part 1
I will show the stages of development I took with my concept art. The experiment I did on photoshop has now become the concept art I've decided to produce.
As you can see here there are lots of changes from the last time I was working on this experiment. I coloured it in by tracing over the light and shadow I did in black and white, this helped me to better understand where the darker and lighter shades of colour go. I also added in the cracks you find in wood to give off the impression that the guitar has not been use in a long time. Also I adjusted the lighting so it looks more natural.

Finding out how to texture wood
I researched how to texture wood. At first I wasn't really finding much, but then I saw an artist on youtube who made a video about texturing wood. I'm not sure what this persons name is but their youtube name is Sephiroth Art.
Sephiroth Art (Youtube Username)
This is a screenshot I took of the art to show you what it looks like.

I like the style the artist has used here, It's quite simplistic but very well done it looks like it could fit nicely into a video game. This art could apply to both the 3D and 2D; I could use it for my promotional art to figure out how to get a nice wood texture, also I could use it for when I get to the texturing stage of my object; this is what I like about this art it can be used for both sides of the spectrum. Since it's photoshop they probably used a wacom tablet and a pen to do all the painting. They used several different shades of brown, some orange and maybe even a bit of yellow to colour this painting.
Artist Interpretation

Tuesday 28th March 2017 Session Targets
I want to do much more research because I feel that I have been slacking significantly in that department.
Tuesday 28th March 2017 Session Targets Achieved
I managed to get quite a bit of research done in this session.
Developing Concept Art: Part 2
I decided to focus more on playing with the texture of my guitar to make it look more interesting, as you can see I have started to refine the little cracks and wear and tear you find on old wood. My next step would probably be to maybe add some signs of decay like fungus or mold.

Blocking out Model: Part 1
I'm beginning the process of blocking out my model, I've just finished the body of the guitar and I'm going on to the guitar neck next. I'm going to do each part of the guitar individually and put them all together after each of them is Uved and textured.

Developing Concept Art: Part 3
I decided the mould and the moss would be very out of place on the guitar considering it's in a room. The most obvious detail I've added is the name Gordan inscribed into the guitar, at first it didn't look it was inscribed in the guitar, however after plating with different lighting and shadow effects I finally managed to make it look like it was inscribed into the guitar. I also added little lines on to the wood to make it look more textured, I think this worked quite well to make the wood look grainy and enhance the feeling of how old and beat down this guitar is.

Feedback
My tutor went through my blog with me and she gave me some feedback to help me improve my concept art and my blog in general.

Developing My Project Further
These are suggestions to further improve my concept art from my fellow classmates.

The Different Components Of a Guitar
I found an image that shows all the different components that makes up a guitar and what they are called. While this doesn't help me with my practical work it does help me to understand guitars, you can't really model or paint something if you don't know how it works.

How to construct a guitar
I'm researching how I would construct a guitar myself, so I can get a better idea about how to build one in Maya. This will make my finished model in Maya seem more true to life.
I got all the different steps and images from this website:
Step 1
Choose what outline you want for the guitar before you begin the process of building it.

Step 2
Find some suitable wood to use for the guitar. Then use the sketch you make to cut out the shape of the guitar with the wood.


Step 3
Next you start sculpting out the shape of the guitar.


Step 4
Now you should begin the process of making the fret board and the neck. Just for reference the fret board is the board on top of the neck and the neck is the bit that the headstock is attached to.

Step 5
This was probably the most useful image out of all of them. I thought the headstock was attached to the fretboard and the back of the neck, but it turns out that's not the case and the headstock is only attached to the back . I really should have picked up on this by just looking at my own guitar.

Step 6
This is what it looks like when the neck is altogether. Now that I'm seeing it here I'm just wondering why I didn't notice this on my own guitar it's so obvious.

Step 7
The back of the neck is smoothed out.

Step 8
The divisions are carved into the fretboard.

Step 9

Step 10

Step 11

Step 12

Step 13

Step 14

Step 15

Step 16

Step 17

Critically analyzing my work
The artist I'm most inspired by is Fabian Perez. This is because I feel that his work work best represents what I'm going for with my promotional art. His art work is based of realism but it slightly more abstract, which is really what I'm trying to accomplish with my finale piece.
I'm heavily inspired by the mystery and crime genre. I mainly work in photoshop with a wacom tablet and pen. I have worked in dark to light for coloring, used line art for my concept sketches also I smudged to get nice shading effects on my close up sketches and of course I have used perspective for my promotional art concepts.
When I begin a project I always start with moodboards and initial sketches. The reason I do this is because moodboards are a really quick and convenient way to map out the ideas your think of and it's the same with initial sketches they're a very convenient way to jot down the ideas you think of quickly and efficiently, they're both good ways to get a jump start on your project.
Wood Research
Looking into different wood texture to see which ones would suit the guitar I'm painting. I found a bunch of different wood textures online, so I did interpretations of them to try and get a better Idea about all the different colours and textures you would have to do to make the wood really pop out.


Blocking out Model: Part 2
Here I'm using the reference images I found to assist me in blocking out my asset, I personally think it's going quite well, at the moment and I'm feeling a bit more confident about how my model is going to turn out.
Thursday 6th April 2017 Session Targets
I want to do some photoshop experiments and continues on with the block process of my model. Also I would like to Continues with my research.
Blocking out Model: Part 3
I added on the back bit of the neck and I had to fill in the at the back using a cube, I might have to get creative with that so it actually looks like the part of the guitar.


 I have now completed the block out stage for my model, the next stage is to refine it further and get it ready for UVing. I made each part separate polygons and I haven't combined them yet because it makes UVing and texturing far easier.


I want to do some photoshop experiments and continues on with the block process of my model. Also I would like to Continues with my research.
Blocking out Model: Part 3
I added on the back bit of the neck and I had to fill in the at the back using a cube, I might have to get creative with that so it actually looks like the part of the guitar.

Colour Experiments
This Easter I decided to practice with my colouring skills. I looked into hot and cold colours, also I did some experimentation with complementary colours.

Guitar Form
I was struggling trying to find a solid design for my guitar. To remedy this I used the reference image I took of my own guitar, then I painted over it in black to create the silhouette. I will tryout a bunch of different designs for the color and the detail using this silhouette, the design I'm most happy with will go onto be my final promotional art.

Iterations for the position of Gordan's name on the Base
I've tried a bunch of different positions for where Gordan's name should be carved into the base. I used a temporary colour to figure out where the name should be. I will decide which position I think will look better on the guitar, then afterwards I will choose what colour of wood to use.

I decided that iteration 4 would work best for the guitar. This is because when it's going up the side, Gordan's name is not going to be obscured by any of the other components on the guitar.

Iterations of Wood for The Guitar
I made several different versions of wood to choose from. In the beginning I was having trouble with the colors they were always too bright, then I realised it wasn't the colors I was using it was how high the saturation was. On iterations 1 to 3 I used very saturated colours and on iterations 4 and 5 I tuned down the saturation on the colours; as you can see on designs 4 and 5 the colours are a lot more pleasant to look at.

I went with iteration 5 for the colour because I think that it's the most appealing to look at in terms of colour. Also I feel that this colour gives off quite a mysterious vibe, which fits into my game concept perfectly.

Fusing My Chosen Iterations
I took the two iterations and fused them together. While this is not the final concept this is definitely are marked improvement over the first. I feel that the colours compliment each other far better and the painting is a lot more appealing to look at.

Developing the Final Concept Piece
Using the same palette as before I tried to improve the texture of the guitar. I think I have managed to pull it off I can definitely see that some texture has started to form. I also decided to have the name scratched in to the guitar rather than carved because personally I think that feels more like something you would write onto a contract; in this case the guitar is the contract.

Here I have started to make the neck. I choose the colour purple because I think it contrasts very well with the brown I chose.

Blocking Out the Model Part 4
I have added the head stock to the guitar this is just the blocked out version I will develop it further down the line.

Blocking Out the Model Part 5
I looked at the way the guitar was built and found that the headstock attached to the fretboard and the back of the neck is separate from the fretboard.

I also adjusted how the back of the neck looks, trying to get the slight curve you see on most Guitar necks.

Developing the Final Concept Piece- P2
I'm having some serious problems trying to really nail the perspective of my guitar design. To remedy this I did a sketch to really try and accurately represent the perspective I'm working from.

I straightened out the wood because my tutor informed me that the wood grain on the guitar does not follow the curve; He said it looked far to much like hair. However even when straitening it out it still does look far to much like hair. I need to so something to it to make it more wood like but I'm not quite sure what yet.

I found a wood texture that I think really suits the style I'm going for with this piece. I'm going to use the colour palette I have and use this wood grain as a reference.

I changed the perspective of the neck to make it look like it's going straight up. I think that the wood is actually starting to look like wood, although it still need a lot more work put into to it.

Blocking Out Model part 6
I modelled out the basic shape of the headstock. I took images from both the front and the back and put them down below. The headstock in the front is connected to the fretboard which is the board attached to the back of the neck. The back of the headstock is attached the back of the neck.


Developing the Final Concept Piece- P3
I applied a new background and added the headstock on to the neck. I'm still not sure how I feel about the wood it needs more refinement and polish before I can call it finished. I personally think the whole thing needs more polish before I can pass it off as promotional art.

Silhouettes
Here are some silhouettes for different guitar designs. I will use these to figure out how I'm going to use these to find a more interesting design for my guitar, it looks okay at the moment but I want a design that will give it more character.

Colour Palette for Promo Art
Here are all the different colours I'm using in my promotional concept piece. I've got a palette with different shades of grey for the metal, I've got several different shades of purple for the neck also their are two shades of brown, the palette that has the most shades of brown is the guitar body colour and the one with the least shades of brown is the background colour.

Promotional Art Redesign
I did a redesign of the body shape for the guitar with the help of the silhouettes I made. As you can see the new guitar body is more visually interesting than the previous one and the wood texture looks far better. I think I'm definitely going to stick with the new design it just has much more potential than my previous one.

Promotional Art Development
I've started the process of adding the other components for the guitar. I put the pick ups and the bridge on separate layers than the base of the guitar, this will make it easier for me to refine them with the colours of the body clashing with the metal on the pick ups and bridge.

Block Out Model (Near Completion)
I applied my guitars new design to the model and began to start to blocking out all the different features. I managed to get quite a bit done and I'm almost ready to start adding detail. The only things I need to block out are the tone and volume nobs, the strings and the jack, also I need to finish of the inlays on the neck.

Refining the Components
I applied more detail to the pick ups and the bridge by trying to add a metallic texture to them, I think I was quite successful in my goal. Also I readjusted the name scratched into to the wood and changed the style to make it suit the new guitar design.

Block Out Phase Completed
 I have now completed the block out stage for my model, the next stage is to refine it further and get it ready for UVing. I made each part separate polygons and I haven't combined them yet because it makes UVing and texturing far easier.
The Evidence Room
The evidence room is a piece of art that is going to be displayed at the Royal Ontario Museum on June 24, 2017. This piece is by a group of artists; Ann Bordeleau, Sascha Hastings, Donald Mckay and Robert Jan Van Pelt.
This is what the exhibition looks like. I choose it because I thought that my guitar looked a little bland on it's on, so I thought I would put it in a background to show it's in an evidence this will hopefully make the concept art more appealing.
Artist Interpretation
I've done an artist Interpretation of the exhibit to try and get an idea about what the evidence room my guitars in will look like. This will also help me recognise shadows in an environment.

A New Direction for Promo Art
I think looking at the guitar on it's own is a little boring so I want to add a background. So at first I wanted to try and put it in an evidence room to show it's been taken as evidence for Gordan's murder case, that's why I choose to do a artist interpretation of that evidence room exhibit.
I focused on one part of the evidence to try and show that his guitar is in one section of the room. I don't like this version the background looks really bland, also a giant hand holding the guitar looks weird and not in a good way; it just looks out of place.

On a better note I re-texture the guitar and I actually feel proud of it. Completely re painting made me improve on my previous design. I tried to readjust the background but it's still not working for me. The problem I'm having with it is definitely the colours, they're just so bland I don't really like using greyscale and I normally only use it for certain things.

I completely changed my background. It's no longer an evidence room it's now Gordan's music room, where he keeps his guitar. This is going to be one of the first acts in the game, your exploring around Gordan's apartment when you find the secret room where he kept his guitar.

I'm currently in the process of re painting the guitar to improve the design. I have now added the string and the tune/volume adjusters, also I've re-added Gordan's name scratched into the guitar. However the newest addition to the guitar is the strings.

I finally managed to make Gordan's name look like it's actually scratched into the guitar. I've also added in more detail to the pick ups and the tone/volume adjusters. The painting still isn't visually interesting what I think it needs is some extra component added to it to spice up the design.

Uving Model
I had a go at Uving my model I haven't got any textures yet but I did it to try and get used to how the new UVing system works in Maya 2017.
To accomplish this I went into the UV editor and made the mesh into a planer map. I made an edge that went all the way around the mesh then I did shift-right click to cut the edge to separate the UV's.

Peer Review for Model
I quickly rendered out my model and put it in the drive to get it peer assessed. I also had to give someone else feedback on their work while mine was getting feedback. When I got the feedback I found there where a lot of things I agreed with, but there were also a handful of things I didn't agree with.
I definitely agreed with making the edges smoother at the moment the edges are sharp and unnatural looking. I already have the bridge blocked out but adding in a tailpiece actually might help to spice up the guitars design.

A New and Improved Guitar Design
With the help of my tutor Chris along with two classmates Jessica and Adam. I managed to come up with this entirely new design for the guitar. I thought that the original design lacked colour and that feel was unanimous with everyone there.
Jessica pointed out that the perspective was really awkward and that was probably the main problem. The perspective was so weird and convoluted that I spent much more time on the perspective than I did actually on actually making an interesting design.
Chris told me I should use the front view from the orthographic views for my 3D model, as a reference for the concept.

As a result of this I came up with the new design that you see below. I'm actually quite pleased with it which is a feeling I haven't felt for weeks now. Getting rid of that awful and clunky perspective was probably the best thing I did to progress further with this project.
The problem with the other perspective was that it was too complicated. To get the perspective looking good I would have had to have executed it almost perfectly. This would require a knowledge of perspective I simply do not possess yet. Also if I had kept trying to adjust the perspective I wouldn't have time to do anything else and it would of just ended up looking sub par anyway.

Iterations (Design Mods)
Throughout the final major project my guitar has gone through several different designs. A large majority of the designs look the same because they where done with the awkward perspective I had. The colour has changed three times throughout the whole project and the overall design has been changed five times.

Iterations (Perspective)
I used the transformation tool to make a bunch of different interesting perspectives for my guitar. I did this because I want the guitar to be put in an interesting angle when I do my promotional concept art. I need a perspective where you can see Gordan's name scratched into the guitar, but you can also clearly see what the rest of the guitar looks like.

Iterations (Lighting)
Here are some lighting iterations I could use in my promotional concept piece. Lighting is one of the most important parts when it comes art. Lighting adds depth and life to your art to make it look 3D, rather than it just looking like a flat image on a piece of paper.
To make these I went on photoshop and added some basic lighting to make them look 3D.

Finished Guitar Design
I've finally finished off my guitar design it was a long and frustrating process but it paid off. I think it's much better design wise and looks far better than previous ones, even though the perspective I used is quite basic I think it works to show off the design better then any other perspective I could've chosen.

Promotional Art
This is my promotional art it's not in a finished state yet I still need to add the highlights and the shadows. I'm very disappointed in this concept art I wanted to do so much more with it but I just don't have enough time. I hope in later project I can learn not to be so caught up in difficult perspective so I can come up with an actual good design.

Finshed Promotional Art Design
This is my finished promo art I added in the highlights and strengthened up the shadows. I'm still unimpressed with it but I'm going to have to finish it off here because I don't have enough time left to work on it further.

Modelling Concept Breakdown
I have broken down my concept art into several different part to estimate the time it will take to model them. I'm doing this to find out how much of the project time I will need to set aside in order to complete the model. This will help me allocate my time better while progressing through this project.

Through doing this I managed to find what my minimum and maximum times for modelling where.
The minimum modelling time is 15 hrs.
The maximum modelling time is 19 hrs.
Model UV Layout
I finished off the UVs for my guitar and managed to fit all of them into the 0 to 1 UV space. You've probably noticed on my model I've only done one Uv for things like the strings and the tuners which can be multiplied. This is because there will be little to no adjustment on each of these individual components.

Colour Map For Guitar
Here is the completed colour map for the mesh of my guitar. I think this a fairly solid colour map and it will look good when it goes on to the guitar.
Bump Map for Guitar
I've also made a bump map the will go onto the guitar to add the textures like Gordan's name scratched into the guitar, the nails on the scratch board for the guitar and the screws on the back plate of the guitar.

Normal Map for Guitar
This is the normal map I made for my guitar. This normal map is actually Unused because messed up the textures of my model.
Render Test
Since the project is nearing it's conclusion I thought this would be a good time to start playing around with the renderer. I played around with the perspective and I tried to see what lighting would work best with my guitar.
I think I need to add more lights because at the moment the colours on the model seemed to be dulled down a lot. Also I want to adjust the perspective so the guitar doesn't just look like it's floating in mid air. I was thinking maybe instead of it being suspended in mid air, I could have it leaning on the side of a wall.

Final 3D Model
This is my fully UVed and textured 3D model, it's not the end product I had hoped for but it's good for what it is. I think It represents the concept art very well and in my opinion the the colours work well. The thing I'm most disappointed about is the texturing I really think I could have done better with that, it's messy and it looks unrealistic and I think if I would of spent more time on the texturing it would have looked far better.

3D Model Renders
I have made a group of different renders in order to decide what my final one will be. First I'm going to do a bunch of renders from several different angles and then I will chose my favourite angle and I will do experiments in both 1k & 2k resolutions. The reason I'm not going above 2K is because It's not necessary, your basically only getting slightly better quality for three times the time it will take to do a 1K or 2K render.
Renders from Different Angles
Render 1

Render 2

Render 3

Render 4

Favourite Render

1K & 2K Render Tests
1k Render

2k Render


Final 3D Model Render
I chose the render I did in 2K with the muted green background as my final render. I'm quite proud of the render I did I really like the light in and how the guitar is leaned against a wall. However I had to combine the things I made into a soft mesh and the things I kept as a hard mesh separately. Because If I selected the hard mesh first and combined it everything became a hard mesh, but if I selected the soft mesh first and combined it everything became a soft mesh.

Evaluation
Intro
In this project I had to make a 3D model and promotional concept art for an asset of my choice;I chose to make a guitar. My goal was to make a guitar that looked like it would feature in a crime/mystery game.
2D Project
For my 2D project I needed to make some concept art for the 3D model and some promotional concept art to advertise the game my asset would be in. I took photos of the guitar I had at home to get a better Idea of the proportions and details that go into a guitar. In hindsight I probably could have referenced those images more because I only used one of them throughout the project and that was one of the main problems I faced when progressing through it.
I researched into a bunch of different artists to research the different ways people show guitars in paintings, how I would paint the material of the the guitar and what background I would use when I did my promotional concept art. I have learned how to probably make a realistic wood texture. I do need more practice with it but I feel I have come out of this project with a better understanding of how to paint it.
I ran into quite a few problems when making the concept art & the promo art for the project. Like I mentioned in my comment about the photos I only referenced from a single photo and that photo was take from a horribly convoluted angle, this meant I didn't manage to be true to the guitars actual proportions. I did however remedy this within the last three weeks of the project by drawing from a front view. When I did this I managed to come up with something I was a lot more proud of, but at this point I was really starting to feel strain and stress of this project.
3D Project
I translated my 2D art to a 3D model on to Maya. I didn't have that much trouble translating my 2D concept art in to 3D. Although my design did change quite a few times throughout the project, I still always managed to make a pretty decent looking model from the final concept piece I made even though I only had three weeks. The fact I was able to produce a pretty decent model within three weeks is a fact I'm quite proud of.
I first needed to block out my model before I went into the detailing phase. Blocking out my model took way longer than it was initially supposed to, this is because I model it from separate images of the neck and body instead of working from a single guitar design taken from different angles. So in the future I should really finish my concept design before I go on to making my model.
When I finished my block out I started to add in all the detail. My model went through quite a big change during the detailing phase because at the same time I had just changed the design of my guitar. This obviously drastically changed the detailing of my guitar but I think this was for the best as my model ended actually looking quite good. Out of all the details I think that the hardest part to translate into 3D was the stings, they didn't seem to line up with the headstock that well so they ended up looking crooked. But I solved this problem by turning them into a smooth mesh by pressing three, this resulted in much cleaner looking strings.
I finished off my model model by Uving and texturing it. I didn't have much trouble with the Uving once I learned the pattern I found it very easy. Doing the colour map was even easier because all I really had to do was put the Uvs onto photoshop and colour over them. The texturing was the most irritating I couldn't get the normal map to look nice so in the end I just used a bump map.
Exhibition
I printed out my promotional concept art and set the print to A2 format with 300 bpi. This is so I can present the promotional art as professionally as possible. While I'm not at all proud of my promotional art I should at least try and make it look a bit professional.
I rendered my model in 2k with a camera detail of five and when I print it out I will also need to set it to an A2 format with 300 bpi. I rendered my model with a 2K resolution and I set the camera quality to 5. I did this because it produce a very high quality image but the render time is only eleven minutes. This was good because I had to make colour of the background for more muted, so when I needed to render again it only took eleven minutes instead of a few hours.
Looking Back
If I could have done this project a completely different way I would have chosen a different asset to work from. My first Idea was not actually a guitar it was a toy robot and I think if I had went with that the project would have progressed on at a much smoother pace.
If I had more time I would have continued to develop my promotional concept art and my model. I would have continued to work on my promo art by improving the lighting, defining all the shadows and refining the colours. I would also take that time to refine my model further by making it higher poly, cleaning up the textures, making a better bump map and re-rendering it so it looks more professional.
Conclusion
As you could probably see from my evaluation I have ran into quite a few problems and I feel that this project is nowhere near the best I could have done. The model just isn't up to the standard I think it should be at my level it's clear that I had to be hasty with it. \The Promotional art is very lazily done on my part there's no atmosphere and I think It could have done with a lot more refinement.
So Overall I didn't really feel much motivation while progressing through this project and in the last week all the motivation I had for the project died. What I should take from this is that I should think through my decisions more and make sure I'm actually going to enjoy what I'm making as well as providing a fair challenge for myself. I should also structure my blog far better so as I progress through future projects I find it much easier to document things.
Bibliography
(2017) Area51customs , [online], Available:
http://www.area51customs.co.uk/woods.html, [Week Commencing: Week 3]
Amnesia The Dark Descent(2010)Frictional Games.[PS4, Windows, Linux ,Macintosh]. Frictional
Games. [Week commencing: Week 1]
Brewer, M. (2017) 2016 Clipartfox, a digital Octopus website, [online], Available: https://clipartfox.com/categories/view/578df3ae72eb1df1763394eaf8b762cbed31fa9f/pencil-and-paper-clipart-transparent.html[Week Commencing: Week 2]
Guitar Hero 3 Legends of Rock(2007)RedOctane, Neversoft, Aspyr Media, Vicarious Visions, Budcat Creations.[Ps3, Ps2, Xbox 360, Wii, Microsoft Windows, Macintosh Operating Systems]. Activision, RedOctane, Aspyr Media. [Week Commencing: Week 1}
Perez, F. (2017) La Herreria Art Studio LLC and Fabian Perez Studio, [online], Available: http://fabianperez.com[Week Commencing: Week 2]
Sleeping Dogs(2012)United Front Games, Square Enix Europe.[Ps4, Ps3, Xbox One, Xbox 360, Microsoft Windows, Macintosh Operating Systems]. Square Enix Holdings. [Week commencing: Week 2]
Tate Britain, [Week commencing: Week 1]
The Elder Scrolls Skyrim(2011)Bethesda Games Studios.[PC, Xbox 360, PC, PS4, Nintendo Switch, Xbox One]. Bethesda Softworks [Week commencing; Week 1]
The Elder Scrolls Skyrim(2011)Bethesda Games Studios.[PC, Xbox 360, PC, PS4, Nintendo Switch, Xbox One]. Bethesda Softworks [Week commencing; Week 1]
Natural History Museum, [Week commencing: Week 1]
http://www.dawsons.co.uk/blog/parts-of-a-guitar-and-what-they-do[Week Commencing; Week 7]
https://www.3dartistonline.com/image/22001/sega_genesis_mega_drive[Week Commencing: Week 2]
https://freestocktextures.com/texture/closeup-wood-grain-plank,315.html[Week Commencing; Week 9]
http://www.instructables.com/id/How-to-build-an-Electric-Guitar/[Week Commencing: Week 5]
https://tatjna.com/tutorials/knight-captain-cullen-dragon-age-2/gauntlets/[Week Commencing: Week 6]
http://theguitaraddict.blogspot.co.uk/2011_02_01_archive.html[Week Commencing: Week 6]
Goffic, T. (2017) Tahirih Goffic Fine Art, [online], Available: https://paintingmommy.wordpress.com/category/classical-guitar-painting/[Week Commencing: Week 3]
http://www.ibanez.com/products/images/eg2017/ARZ200FM_CRS_4L_01.png, [Week Commencing: Week 3]
Langton, B. (2017) Bruce Langton, [online], Available: http://www.brucelangton.com/brucelangtonoriginallespaulbig.htm[Week Commencing: Week 2]
(2017) RRM S ENSE Global Systech ltd, [online], Available: http://www.ranisteel.com/sub_pages/Products/Product_Rani500w.html[Week Commencing: Week 4]
https://www.vintageandrare.com/product/Zerberus-Guitars-Zebrano-Hydra-35942[Week Commencing: Week 4]
http://wynguitars.com/bubinga-and-padauk-carved-4-string/[Week Commencing: Week 4]
http://www.wisegeek.org/how-is-nylon-made.htm[Week Commencing: Week 4]
http://www.guitarplayer.com/miscellaneous/1139/all-about-tonewoods/14591[Week Commencing:
Week 4]
http://www.theevidenceroom.com/[Week Commencing: Week 10]
https://www.youtube.com/watch?v=HX8M4SKa_Cg&t=111s[Week Commencing: Week 4]
https://www.youtube.com/watch?v=rYOox8E8ohc[Week Commencing: Week 4]
https://www.youtube.com/watch?v=FPz8Xyt3z-w[Week Commencing: Week 4]
https://www.google.com/patents/USD510382[Week Commencing: Week 4]
http://www.wood-database.com/zebrawood/[Week Commencing: Week 4]
http://www.explainthatstuff.com/nylon.html[Week Commencing: Week 4]
https://www.youtube.com/watch?v=22NovX6wLCM[Week Commencing: Week 5]
https://www.quora.com/Can-you-put-nylon-strings-on-a-steel-string-acoustic-guitar[Week Commencing: Week 5]
http://www.woodworkerssource.com/shop/category/east_indian_rosewood.html[Week Commencing: Week 6]
No comments:
Post a Comment